Thursday, December 27, 2012

Rolled Sugar Cookies with Lemon


There are times when rolled cookies just do NOT come out the way you want them too.  They spread and fatten - like this hilarious pin on Pinterest - and it can be very frustrating.
However, I found this recipe that truly delivers on its name - The Best Rolled Sugar Cookies. 

Personally, I'm not a huge fan of just plain sugar cookies, so I added some lemon zest to freshen up the flavor and to make them more appealing to my citrus-loving fiance for his birthday.
I think Elliot liked them too. :)
Again, I used my 100-piece cookie cutters and loved the results.  The letters definitely look like children's refrigerator magnets. Haha. But we love babies, so that's okay with me.

Tuesday, December 25, 2012

Have a MERRY CHRISTMAS with Gingerbread Cookies!


I know I've been a terrible blogger, but as you can tell, I'm in the updating mood.

This past semester, I was generally too busy to bake, so as with anything you don't practice, I got a bit rusty.  I had a couple mishaps that definitely discouraged me from baking again... BUT thanks to my beloved GG's (Glendale Girls) - Hera and Christine, they helped restore my baking desires.

We decided to bake and decorate gingerbread cookies together in true Christmas spirit.

First, we used "Eileen's spicy gingerbread men" recipe and doubled the batch.  Substitutions:
  1. Used butter instead of margarine (just cuz that's what I had on hand)
  2. Used ground ginger instead of fresh ginger
  3. I don't have nutmeg and cloves, but what I DO have is a "Pumpkin Pie Spice" blend that has a mix of ground nutmeg, cloves, and cinnamon that I used instead
We rolled out the dough and used my 100-piece cookie cutters from Wal-Mart!

Next, we made a couple different colors (black, white, yellow, green, red) of frosting - just powdered sugar, water, and food coloring - in ziploc bags.

It definitely took us a couple tries to get used to the flow of the frosting and to get our creative juices flowing.
We had several .. interesting.. cookies, but plenty more adorable ones. 

We made stockings for each of our GG's and these were some of my favorites.
After a while, I got tired of doing just the same, typical gingerbread men, so I made some new characters.
Going clockwise, 
  • Classic GB man by Christine
  • Christine's elegant Christmas tree
  • Christine's GB Lady in red
  • My classy GB gentleman
  • Hera's clean, cute Christmas tree
  • Hera's sweet little GB girl
  • Hera's uniformly executed plaid stocking
  • My California-Christmas bikini-clad GB girl
  • My Shrek GB Ogre (in honor of our Halloween costumes)
  • And my favorite - my GB Little lad who loves berries and cream. hehe.

MERRY CHRISTMAS EVERYONE!
Jesus loves you. hehe.

Monday, December 24, 2012

Do you see what I see?

A tooth, a tooth folded in my sight,
From a cup that was filled with delight,
From a cup that was filled with delight!

hehe.

This was a half gingerbread latte + half pumpkin spice latte.  Delicious!
I love holiday Starbucks drinks.  So sad that they'll be gone soon :(

Lemon Bars

My fiance loves citrus-flavored desserts, so I made these for his birthday.


Nice, easy recipe found here. 

Only changes to the recipe:
  1. I grated some lemon zest into the dough.  I was using the lemons for the juice, so why not make use of the rest of its goodness, right?
  2. It was definitely difficult taking the lemon bars out of the pan even though I sprayed cooking oil on it.  So for next time I'm going to try laying down some greased wax paper first, which should hopefully help!

Friday, July 6, 2012

Red, White, and Blue(-Green) Velvet Cupcakes

In honor of Independence Day, I decided to make Red and Blue Velvet cupcakes!
Red, white, and blue-green =\
But, as you can tell, the blue food coloring didn't come out quite as expected. 

I made one batch of cupcakes, split it into two, and then put the food coloring in last, so maybe it affected the colors. boo. 


I also bought some star-shaped sprinkles to go with the theme.

Happy Belated 4th!

Friday, March 23, 2012

Composite Restorations

The first half of the semester, we've been doing composite preps (AKA drilling the hole for white-colored fillings), but as of two weeks ago, we started restoring (filling the hole) and it is so much fun! I totally love it.  Way more fun and prettier than amalgam (metal fillings).

This is before:
Prep (drilled) on the two middle extracted teeth (class II).
Notice the caries on the 3rd tooth (black rotten spot)

This is after:


Composite Restorations (tooth-colored fillings) - Lingual view

Occlusal view


And here's one more tooth:
Before: Note the decalcification on the middle tooth (white lines)
During: Cut it down to imitate a fracture (class IV)

After: Then built it back up - no more white lines!
(My mesial contact is too narrow.)


Isn't dentistry so cool?
I'm so blessed to be studying and doing what I love.
God, you da best.

Best Chocolate Chip Cookie Recipe Ever

If you're ever looking for a soft, delicious, reliable chocolate chip cookie recipe, this is my go-to recipe (thanks, Hyerim!)
http://allrecipes.com/recipe/award-winning-soft-chocolate-chip-cookies/
The secret lies in the pudding!

cookie monster.

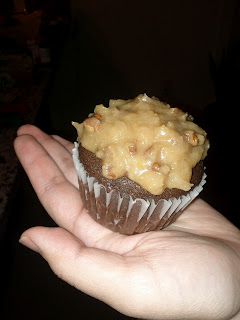
German Chocolate Cupcakes

It was my boyfriend's boss's birthday today, so David made a request for some German choc. cupcakes - (Mr. Amundson's fave!). I've vaguely heard of it before, but I never really saw or tasted it, but it was a great time to try!

So, I first baked chocolate cupcakes - first time baking chocolate cake from scratch - and lemme tell ya, the flavor is ALWAYS better when it's from scratch!

I used to LOVE the easy cake mixes, and honestly, that's where my love for baking first began in high school. (that is, after the Easy Bake Oven - but that one was a huge letdown.)
But once I started baking from scratch, the cake mixes taste too eggy to me now.

But anyway, onto the pictures!

Left: Ready to cream the butter + sugar in my KitchenAid;
Right: dry ingredients (cocoa powder, flour, baking soda, salt)
The recipe calls for buttermilk, but the suggested alternative is using milk with some lemon juice!  It creates a chemical reaction that makes the milk ... curdle? and gives it a buttermilky flavor.
(science shout-out --> PRECIPITATION REACTION of the protein casein in milk - acid+base reaction, i'm assuming)
BUT, I did not know this would happen, so I completely FREAKED out when I was pouring the milk mixture into the batter because I thought my milk was spoiled!  But I realized, that was supposed to happen! - who knew!

Delicious final product: YUM.
The chocolate cake recipe from scratch makes the chocolate taste much deeper and richer, so I loved that.


Now it was onto the topping that makes german chocolate what it is:
Heated mixture of evaporated milk, brown sugar, butter, coconut, and pecans

Allow the topping to cool and then glop it on!

German Chocolate Cupcake!

And there we have it!
Happy Birthday Mr. Amundson!
Hope everyone at Minuteman Transport enjoyed them! =)

Thursday, March 8, 2012

Boredom

During one of our timed midterms (COMBOT), we have 1 minute to answer each question.  Obviously, some questions take about 5 seconds to answer, so you gotta find ways to entertain  yourself.

This is what I did.
M-I-C-K-E-Y  M-O-U-S-E!  Mickey Mouse (Donald Duck!)

Of course, that took all of 30 seconds, so it didn't kill that much time, but I wonder how long Mickey will go unnoticed by the janitorial staff. heheh.

He's guaranteed to stick around as long as I'm sitting there to re-draw him in if he ever gets erased.  So after 2013, we'll see how long he lasts! Seat P5 in Sim Lab.  hehe. =)

Wax-Ups

Since this blog is sweet TOOTH, I figured it was time for some dental school pictures!

For our Morphology/Occlusion class, we have to "wax-up" different teeth.
Basically, we made a stone model of teeth.  Then we shave a tooth down to nothing and then build it back up using wax and instruments!

We had already done this tooth (#14 - upper left 1st molar) so we had to cut it off and do it again.
Goodbye wax.
Starting again from scratch.


I liked my wax-up, so I preserved it.  Onto the next one.


1. Build up with big blob first

3. Triangular/Cusp Ridges
2. Add cones for the cusps

4. More ridges & Fill-in


5. Clean up and polish!

yay.  I love dentistry.


Tuesday, March 6, 2012

BlogLovin!

http://www.bloglovin.com/blog/3551689/joans-sweet-tooth?claim=mkjkw9cmchf

Follow me on Blog Lovin!

Football Cookies

Our church (CCH - Community Church at Holliston) had a women's football tournament on Saturday, so I decided to make some football themed goodies for the event.

I had just finished my midterms for the week, and the game was on Saturday morning, so I baked allll Friday night into the wee hours of the morn.. and lemme tell ya, baking when tired doesn't usually work out for me.
I wasn't thinking, and I overmixed my first batch of cookie dough and it became a huge pile of depressing (but sweet) crumbs.

Second batch (the red football helmets below) were not cutting properly, so I had to keep freezing them to be able to cut them, but something must have been wrong with the butter proportions because they spread while baking when they shouldn't have. (Very frustrating).
Third batch (chocolate helmets) turned out okay, but my icing/piping was not clean.

So all in all, they did NOT turn out the way I was hoping =( but you learn the most from mistakes, right?
And I figured, the angry birds were a success, so I was due for some failures - for every high there is a low (for every to there is a fro. hehee)

So anyway, here are the cookies:
Chocolate sablee cookies for the football cookies - very crumbly/crunchy texture,
Royal icing (egg white + powdered sugar) for the football stripes.
My baking book told me to use parchment paper cones when using the royal icing, but I stubbornly didn't follow the rules and used a ziploc bag instead, so the results were not as neat and clean as I would have liked.
Note to self  - next time, follow ALL instructions.


Sugar/Butter Cookie  shaped into helmets,
Red sugar crystals for our team color (use beaten egg whites to "glue" the sugar on)
Same royal icing for the helmet mask (again, could have been much cleaner)


But anyway, I'm so proud of our football team and coaches - they did an AWESOME job at the tournament!
Plus, I have a wonderful CCH/Overflow family and they enjoyed the cookies, so that's really all that matters in the end <3

Friday, March 2, 2012

My first Cake Pops!


Ribbons make everything cuter.

So when I first saw cake pops, I assumed they'd be complex and difficult to make.  
The first cake pops I ever ate (and the only other ones I ever ate) were very messy and overly moist/rich, so I didn't intend to give them a try myself.  

But walking around Target the other day, I found a cute bright green cake pop pan and I had a gift card, so I figured, eh, why not?
Wouldn't you want to buy me?
So I started to look up different recipes, but I was shocked and frankly, disappointed by the ones that crumble up boxed cake mix and throw in a whole load of frosting.  
Personally, I'm not a big fan of frosting and I prefer homemade, fluffy cakes.

But thankfully, with the cake pop pan, you can just make your own cakes, no added frosting needed!

So, I just used the red velvet and same melted chocolate from the angry birds cupcakes for these and sprinkled on some red sugar - gives it a perfect little crunch.
peekaboo!
I didn't know how high to fill the pan, so some of them were a little short, but I added frosting to round it out a little more.  But, the chocolate covers a multitude of sins (heh heh) so it was fine. =)

Lollipop anyone?
I didn't have styrofoam to poke my pops into, but I improvised and filled up my cheap cheese grater and when I still had a few pops, I poked them into my paper towel rolls to dry!  Whatever works, right? Got the job done! =) 

How to Make Angry Birds Cupcakes!


My first attempt at fondant!
Pretty good, if I don't say so myself, hehe. ;)

Here's a run through of my baking process:
Step 1 - Make fondant a day or two ahead of time, wrapped tightly (thanks to CookDuke!)
  • There are a lot of random ingredients, so buy them ahead of time! (i.e. glycerin)
Step 2 - Bake cupcakes! I made mine red velvet.  Then add a layer of frosting to the cupcakes for your fondant to stick to (cream cheese frosting for red velvet).  This will be your crumb coat layer, and keep the extra frosting to use as the GLUE for all of your fondant work!


Step 3 - Cut fondant into pieces to make the different colors using gel food coloring by kneading! (yay for years of ceramics!)
Also, do all the fondant work on a silicone mat -- I bought mine YEARS ago and never had a reason to use it, so I finally took off the wrapping and used it WELL. =)

  • Main body colors: Red, light blue, yellow, green 
    • for these, I made them about the size of a fat piece of pie.
  • Other features: White (eyes, yellow bird's chest), lighter green (pig's nose), orange (all the beaks), pale orange (red bird's chest), brown (eyebrows and yellow bird's hair), pale orange/brown (yellow bird's eyebrows), orangey-pink (blue bird's eye bags)
    • These features are much smaller, so a small piece of fondant will suffice (about the size of your palm)

-- Didn't take a picture - too messy.  I brought home a bunch of gloves from school to keep my hands from staining  through the kneading process.

    Step 4 - Roll out the pieces of fondant 
    • I bought a 101-piece cookie cutter set at Wal-Mart the other day for $10, and it had the perfect sized circle for the cupcakes!  But obviously, any biscuit cutter or circular fondant/cookie cutter will do. Maybe even a jar or tupperware lid!
    Step 5 - Make the other features with the same colors - birds' hair, pig's ears, etc.
    Step 6 - Start the smaller features - I don't have any special cutters, so I had to improvise to figure out the shapes. For everything else, I just molded by hand.
    • For the eyeballs - I used the small circle inside the "6" cookie cutter
    • Pig's nostrils - straw worked perfectly!
    • Beaks - used the curve of the "Y" cutter, and then adjusted by hand
    (the hills have eyes! don't they look freaky without pupils?)

    Step 7 - pupils! - I didn't have black food coloring, or edible marker, so I really wasn't sure what to do, so it finally came to me! I melted some chocolate with a little bit of shortening (chocolate-dipping recipe) and then used a lollipop stick to draw in the pupils. =)
    • I forgot to use the chocolate to color in the pig's ears! But by that time, I was too tired.
    and TADAAA!


    NOTE - keep a color picture of the angry birds nearby and always refer back to it for color and feature references.  I only have a black and white printer, so I had to use my phone, (obviously, it got really messy)


    It took pretty much all day to bake and make all of this, but when my parents came home and saw them, it was worth the trouble.

    I should have posted this, and baked that AFTER my midterms were over, but oh well! Too late nowww.
    I'll post more baking adventures after I finish my midterms! haha =)